Draft: 8/19/2021
(All illustrations by Melanie Shaw; except for the 5 hole binding instructions & making a pamphlet cover instructions, which were created by an anonymous former Art Book Room worker)
Supplies
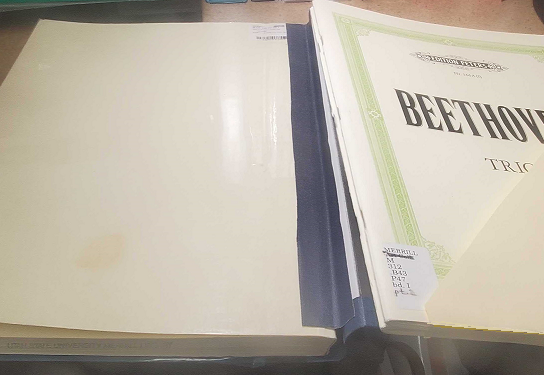
Pre-made Music Binders:
Music Binder Quick Bind with pocket:
MBQB-11-1P-TD (1 Pocket, Tyvec Diagonal)-A (zero spine), 9 1/2” x 12-1/4” Clear front - 100 needed
MBQB-2-1P-TD (1 Pocket, Tyvec Diagonal)-B (1/8 spine), 10” x 13-1/4” Clear front - 25 needed
Music Binder Quick Bind without pockets:
MBQB-11-A (zero spine) 9 1/2” x 12-1/4” Clear front - 100 needed
MBQB-2-B (1/8 spine) 10” x 13-1/4” Clear Front - 20 needed
Resupplies for both: https://archival.com/quickbindmusic.html
Music Binder Spine Wraptm – using for extra thick single-signature scores that won’t lay flat in the above binders
Resupplies: Order Quick Binders, as above (see 1.b.), but with thicker scoring on spines -B (1/8” spine) or -C (1/4” spine)
The Spine Wrap Binders came with a wider spine than the Quick Binds, so we’ve been using for scores & parts with thick spines, or square-back scores & parts enclosures (instead of wrapping spines). The initial order came without pockets, so we make them pockets as needed.
Other supplies for pamphlet binding scores:
Binding Needle, Linen Binding Thread, Awl, and Beeswax
Resupply is from Gaylord Archival (https://www.gaylord.com/c/Repair-Tools-and-Supplies) or TALAS.
Metal Ruler, Triangle or Carpenter Square, Pointed Bone Folder for measuring and scoring (locally supplied)
Card-Weight Paper (supplies can be found locally)
we are currently using pads of Toned Grey Strathmore Mixed Media, 18 x 24 inch.
Binder tape (without adhesive) for making our own binders, and with adhesive for strengthening.
Pamphlet Boards for making odd-shaped binders (two possibilities for resupplies):
Available at Gaylord Archival as 60 pt. Blue/Grey Barrier Board Sheets (25-Pack) 18” x 24” or Part #BG1824-2 here: https://www.gaylord.com/Preservation/Conservation-Supplies/Boards-%26-Paper/Gaylord-Archival%26%23174%3B-60-pt-Blue-Grey-Barrier-Board-Sheets-%2825-Pack%29/p/HYB00951
$133.30 per 25 sheets (this is our usual source)
OR as High-Density Acrylic-Coated Dark Gray Pamphlet Board - they are huge (39 x 40 inches), so we may want them to cut them to 18 x 24 inch (it will cost extra): https://archival.com/archivalboards.html#darkgrey - #DGPB .056 CTD Dark Gray - 39" x 40"
$17.01 each ($0.15 cut per sheet)
PETG clear Plexiglass plastic sheets (12 x 12”), 20 mil (.020”/.051mm) for front of binders - available online from various vendors (usually) through Amazon.
Double-sided archival tape (used in place of glue when making slipcover/pockets).
Always remember when binding music scores: the music must be playable afterwards
Before Binding a piece of music:
Check for loose parts or loose pages.
Parts: if there is more than one instrument or voice:
Are there separate parts tucked into the center or back of the score?
Scores with parts will be kept together, will share a barcode, and will be checked out together in Sierra.
While checking for parts, make sure our tattle-tape hasn't been put into the score so as to glue one or more parts to the score. They need to be removeable. If so, carefully unstick glued parts from the score and cover the tattle-tape with opaque repair tape.
Also, watch for scores with an odd number of leaves, which can contain a continuously paged loose sheet in the center of the folio: if loose, attach to the crease of the center fold with clear binding tape.

d. If the score is much thicker than usual, but still a single-folio stapled score, use one of our “spinal wrap” premade binders. If there are parts with the thicker score, you will need to make a pocket and glue it to the back of binder.
Scores that are not single-folios will need different processing.
1. Set aside any spiral-bound or comb-bound scores for processing decisions.
2. Set aside any square-back (or perfect) bound scores for laminating.
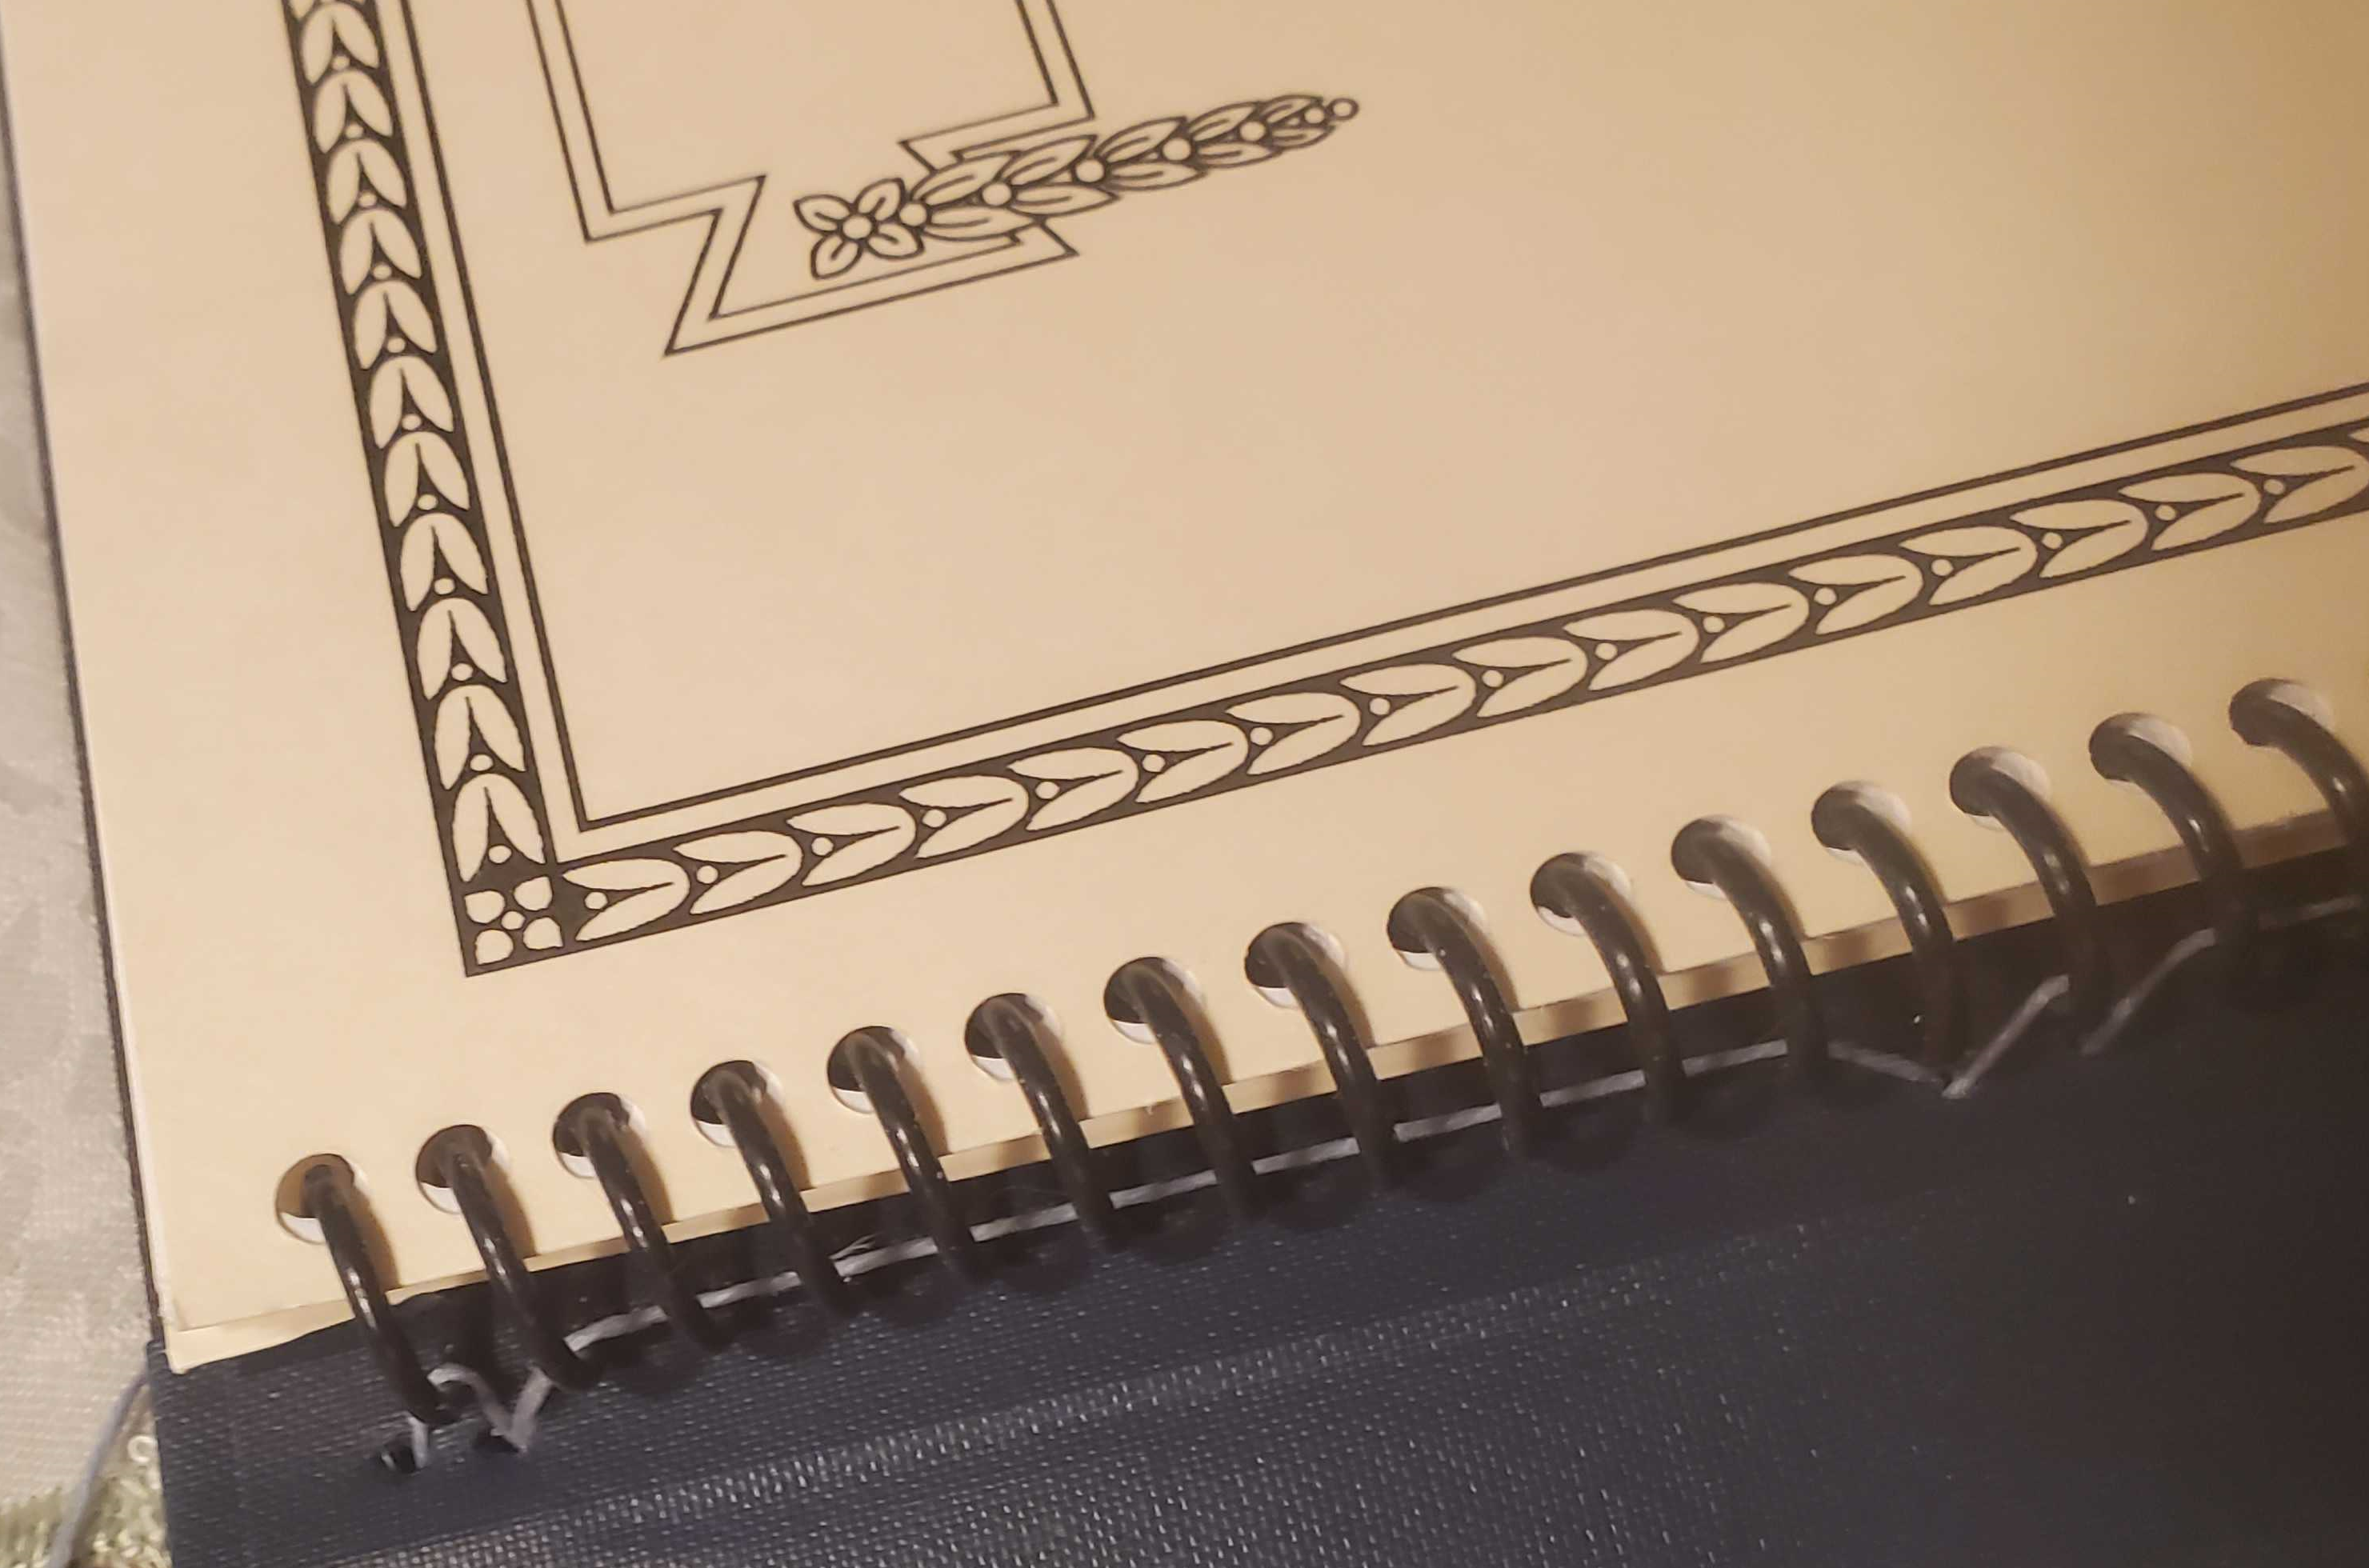
5-hole pamphlet binding: Sewing a Single Signature Score
(Illustrations by anonymous former Art Book Room worker)
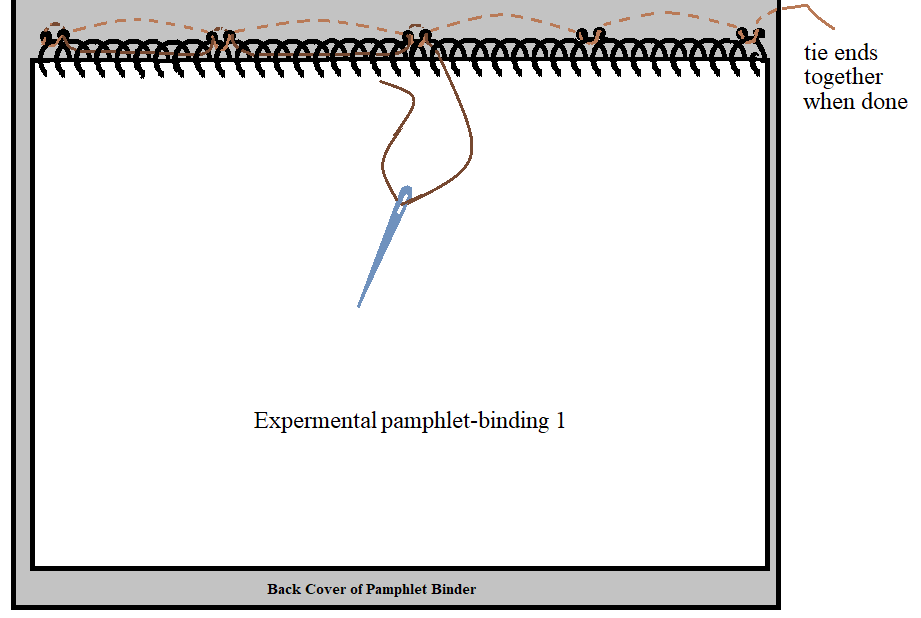
Measure the thread, using the pamphlet binder itself as a guide as shown in figure 1a; unroll enough thread to go twice the length of score edge, plus 3 inches extra, cut the thread, and then use the block of beeswax to wax the entire thread: this will both strengthen the thread and keep it from tangling.
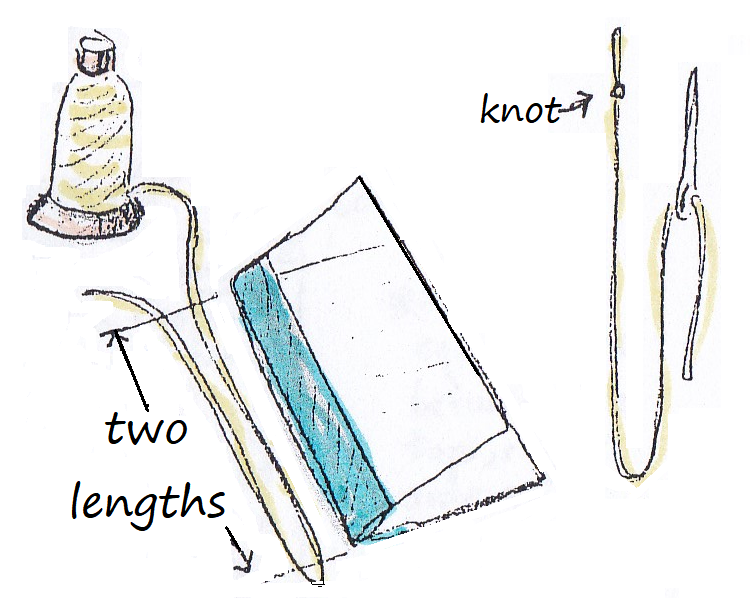
2. Thread the binding needle: you can tie a knot at the end of the thread (leaving about 1 1/2 to 2 inches at the end), or not, depending on how much control you have over the thread during sewing, as in figure 1b. (A knot can help keep the thread from falling out of the first hole.)
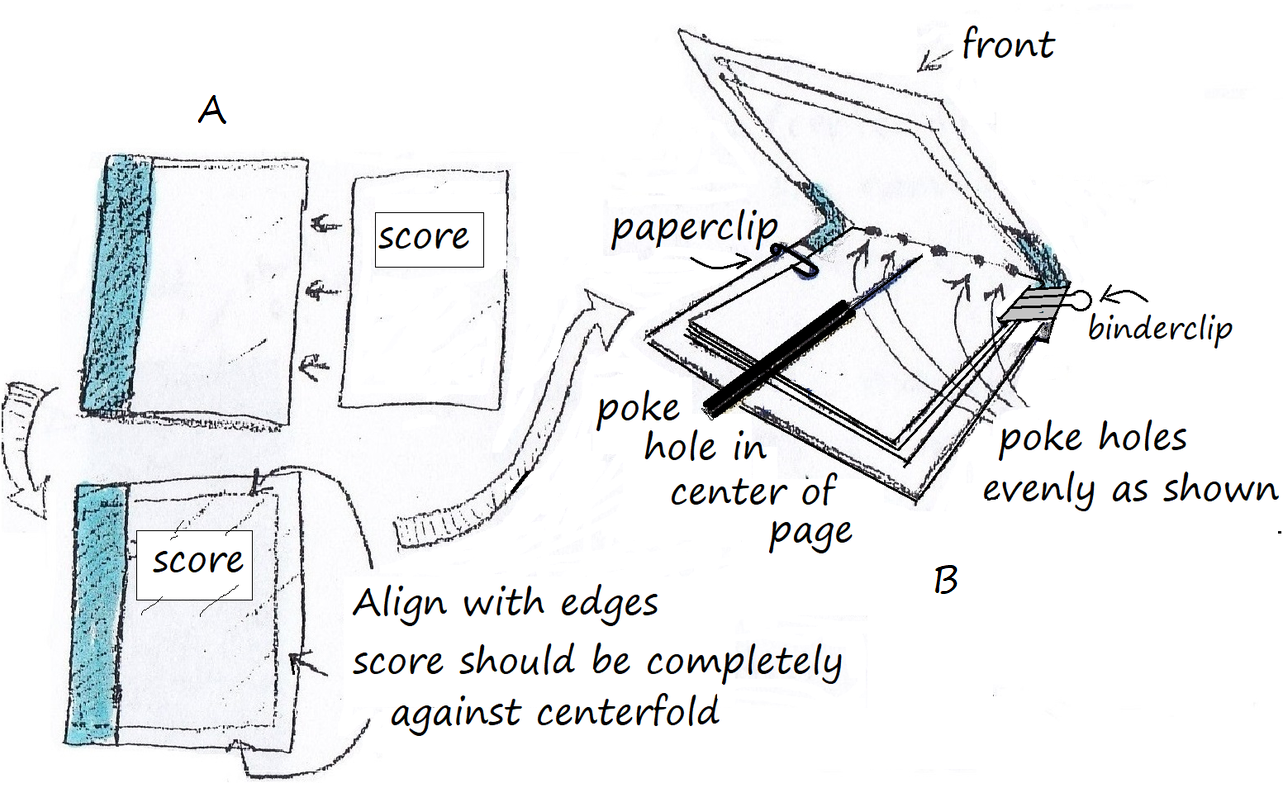
3. Place the score into the pamphlet binder cover and line up its edges with the binder as tight to the binder spine as possible, figure 2A--Open to the centerfold of the score, and use a binder-clip or paperclip on each side to hold the score in place, figure 2B.
4. In the centerfold of the score, use an awl or dissection tool to poke a hole in the center fold, then poke 4 more holes, evenly, as shown in figure 2B. (This will make it easier to get the needle through). Some folks will remove any staples before making the holes.
4. The 5-hole pamphlet sewing pattern starts from the inside center (Figure 3, circle 1), and ends up coming into the center hole again, but from the outside (figure 3, circle 9), making a couple of figure eight patterns through the holes while keeping the thread tight. See figure 4, for step-by-step visuals.
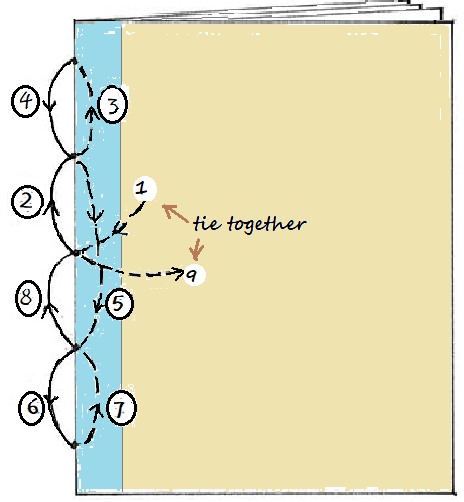
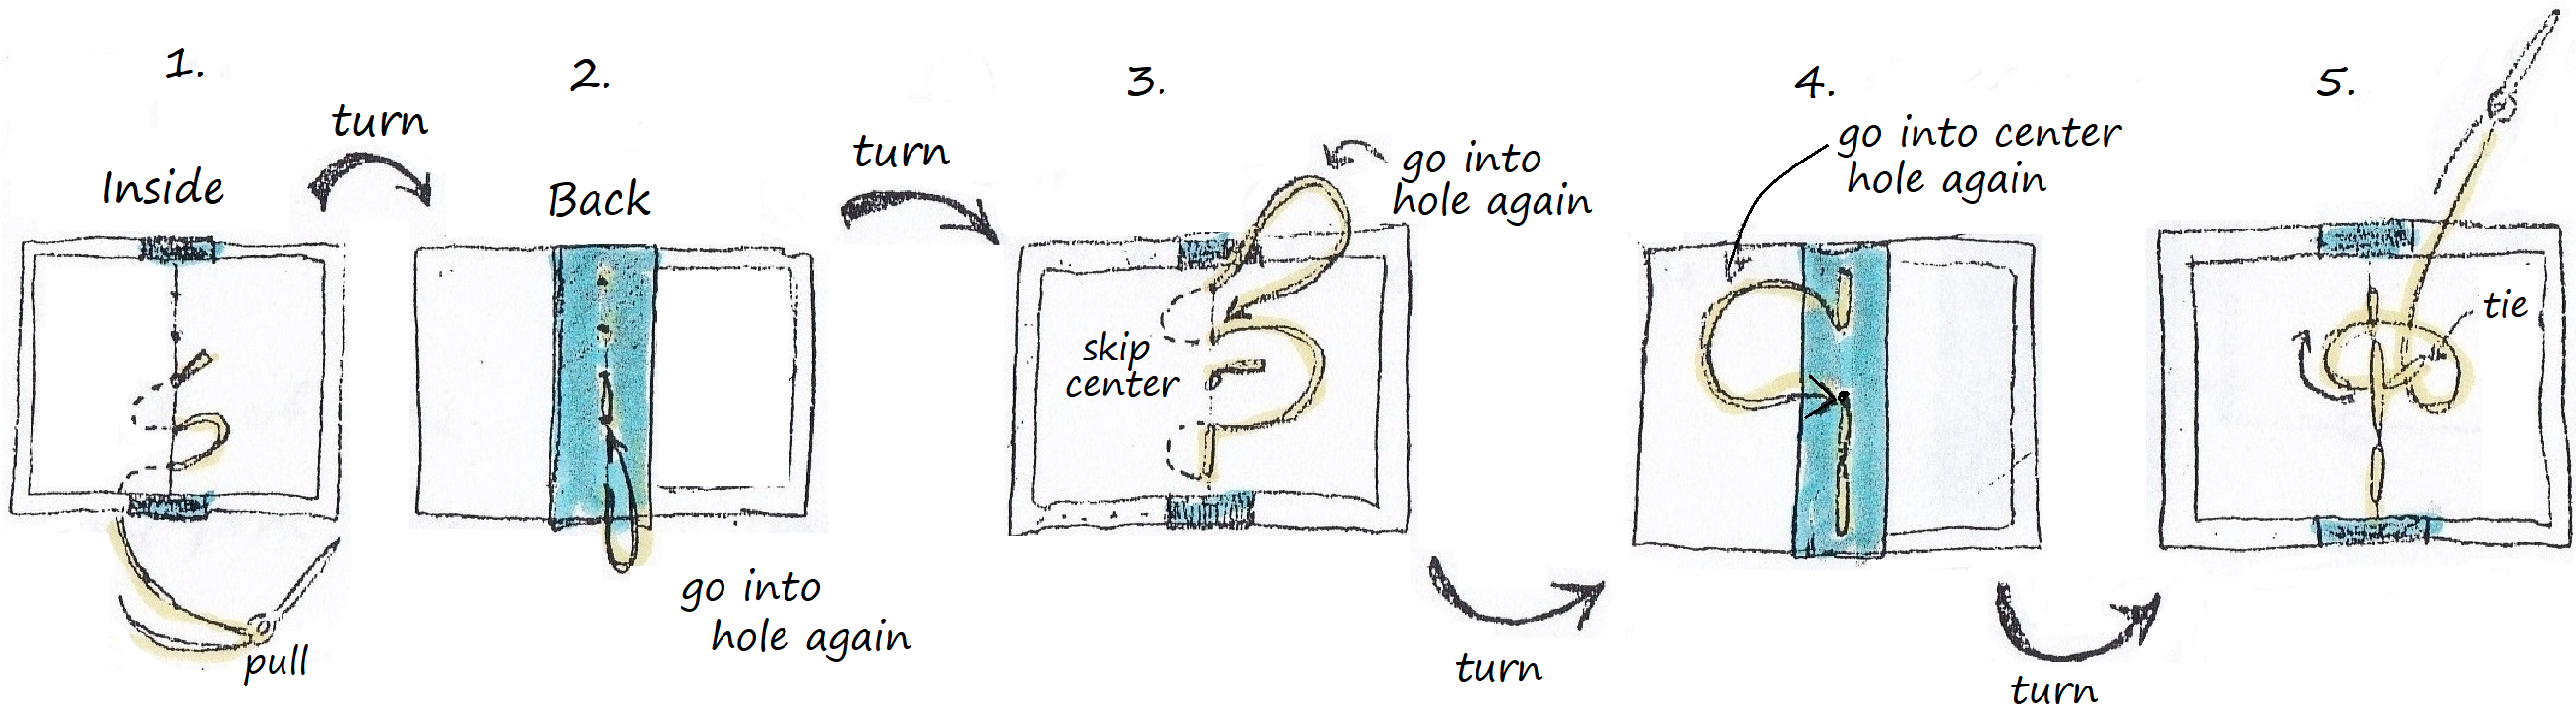
While learning the technique, it is easiest to turn after each set of stitches (shown in figure 4: no.1-5). Pull the thread tight while making the stitches, being careful to pull along the spine, instead of right angles.
The last stitch returns to the center hole, but enters from the back of the binder.
6. Make sure all sewn stitches are tight, then, you can either tie the first & last threads together (figure 3, diagram), OR tie a knot to the center stitch (figure 4, step 5); then trim excess thread off, leaving about 3/4 to 1 inch thread.
7. Finish up by removing any cover guards, and labeling the pamphlet; if there are parts, label each part and place into the pocket on the inside back cover. Stamp Utah State University Merrill-Cazier Library on the score and parts, either on the page ends (if thick enough) or the inside first page.
Parts may not have a cover or title page, so if necessary, trim the labels, or move the label placement to the top corner of the first page of parts, to keep from covering any music.
Print friendly version:
Binding decisions, glossary, and common problems
Single signature scores:
Most of our scores are a single signature of leaves folded in half and stacked together, often stapled in the centerfold gutter. Most of them are within the heights of 28 to 31.2 cm (which shown rounded up to 32 cm, in the score’s 300 field), and can be sewed into our ready-made Quick Bind pamphlet binders.
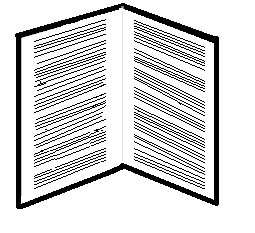
A single signature with just one folded leaf is a folio.

Single signature scores with a compressed spine thickness of about 1.5-2 cm or more may need the thicker spine of our spine-wrap binders for sewing.
Some scores with thicker spines or that have a lot of parts will need hand-made “square” pockets to hold them, and will also need the thicker spinal wrap binders to hold both score and pocket.
If a score is taller than 31.2 cm, set aside for a pamphlet to be hand-made or for different processing.
If a score has a longer width than our Quick Bind or Spinal Wrap binders, set aside for pamphlet making or some other kind of processing.
Square-back scores:
Includes scores with Perfect Binding & Multiple Signature paperback music scores.
Currently we are laminating more of these scores, instead of always making pockets in binders. See: Music Scores - Laminating
Square-back scores with part(s):
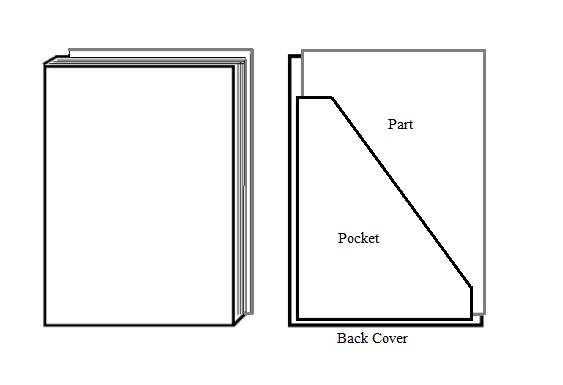
If there is a single part or a few very thin parts, a simple folded pocket can be glued to the back cover of the laminated score.
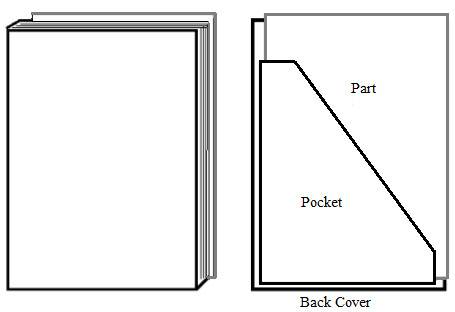
For scores with part(s) too large to fit within the back cover or with several parts, we have continued making a pamphlet binder out of two binder boards, and adding two square pockets to hold both score and parts, gluing the pockets to the front and back of the binder.
For scores with part(s) too large to fit within the back cover or with several parts, we have continued our old practice of making a pamphlet binder out of two binder boards, and adding two square pockets to hold both score and parts, gluing the pockets to the front and back of the binder.
Another alternative is to use binder tape to attach a square-back score into a Pamphlet Binder and make a pocket for the parts.
This square-back score and parts came back to Circulation separated, with no sign of its binder (most likely a binder with two pockets for the score and parts). As an experiment, we taped the large score into a Spinal Wrap binder with binder tape, front & back, and made a square pocket for the 2 parts, glued on the binder back as usual. We’ll see if this proves more durable over time.
Spiral or Comb-bound scores:
Spiral bound and Comb-bound scores open flat for easy music performance, but have numerous problems in a library:
Spirals and combs are wider than the pages causing meshing & damage.
They usually won’t stand upright on the shelf:
Unfortunately, these bindings are becoming more common in music.
We have tried various methods of dealing with these:
Ignore the problem (in the past)
Laminate the front and back covers to make spiral/comb-bound score sit better on the shelves.
Make squared pockets in a binder to hold the entire spiral/comb-bound score (& parts).
Tacketing the spiral and gluing the back of spiral-bound scores into a pambinder.
Sewing spiral-bound scores to the spine of a pambinder.
Laminating covers:
For popular music anthologies bound with spiral/comb bindings, we often laminate the front and back covers (being careful not to cover the holes), while leaving the comb/spiral in place (unless it is coming apart). We use two separate Kapco back cover pieces to laminate them.
This strengthens the back and front cover enough to improve sitting on the shelf, but doesn't address the problems with entanglement and damage to spirals & combs over time.
For some Art Music or Classical scores, we might treat them as above, or we may use one of the processes below…
Pockets in a pambinder:
For Art music with more than one part, we have sometimes made either one large square pocket or two square pockets to hold the score plus parts, and glued the pocket(s) into a handmade pamphlet binder. This allows for easy storage on the shelf while providing protection in stacks for the fragile spines. We have subsequently have some scores (& parts) returned without their pambinder.
Tacketing and gluing into a pambinder
We have just started to attach a single spiral/comb score itself into a pamphlet binder by gluing the score’s back to the binder, and sewing (tacketing/lacing) the spiral/comb to the binder spine; leaving enough space around the spiral/comb to allow it to open flat & move freely. I’m still investigating this option; might be useful for high use single spiral bound scores.

See also Peter Shirts' excellent presentation: “The bane of a music librarian’s existence”: why and how music libraries rebind spiral- and combbound scores archived here: http://semla.musiclibraryassoc.org/semla2019/presentations/Shirts_SEMLA_2019_Spiral_Bound_Scores.pdf
Sewing into a Pambinder
I punched double holes for each station and ran the string thru the spiral; the few explanations I’ve found on the web prefer tacking down just a few spirals since the glued down back cover does a great deal of the work of holding the score in the binder.
Unfortunately, some spiral bound scores come with multiple parts, requiring some kind of pocket (or 2 pockets) glued to the pamphlet. A solution may be to add more sewing stations to the spiral lacing/sewing structure and leave the back cover unglued, for the pocket:
A very strong multiple figure-8 sewed binding, which still allows the spiral bound music to open flat, leaving the back sheet music cover unglued, and allows a pocket to be attached to the pamphlet back for parts.
Or, Archival Product ready-made pamphlets for spiralbound music:
we could purchase ready-made pamphlets made specifically for these problem bindings:
https://archival.com/spiralbookbinder.html
Drawn from photos in the Archival Product website:

Loose sheets of paper:
If a score consists of several loose leaves, it should be set aside for different processing.
Sometimes, we can only house the loose sheets in a pocket in the pambinder:
either leave loose and label each page; or
staple together, which can be difficult to use during performance.
In certain cases, we have “guarded” the pages, using archival light binding or mending tape to form them into folios for a signature. This is tricky work, as music reading direction needs to be maintained.
Folios can also be formed by scoring a fold inside the white space of the gutter and overlapping the pages folded edges. Again, care must be taken to preserve the order of reading. This method is bit more finicky than we usually do, and requires a enough white space in the margin to accommodate the fold without making the music difficult to read.
One sheet of paper:
If a score consists of just one sheet of paper,
we can score a fold inside its left margin (making sure not to get too close to the music notation),
reinforce the fold with light binding tape,
then sew into a binder,
we may also use binding tape to further attach the narrow end to the binder/cover.
For parts, we will usually just house them unprotected in a pocket (with labels), but if it’s a high use part or printed on flimsy copier paper; we will fold card-stock into a part-cover (making it slightly larger than the part), and sew it as usual.

Accordion folded sheet(s):
If the musical notation in a score runs across one or more accordion-folded pages, these should be set aside for some other kind of processing (possibly just labeling and housing the folded structures inside a pocket in a binder).
Accordion-folded score with page reading direction shown (often used where page turns would be difficult to manage); they may have the same order of reading across the back.
Making a pamphlet binder for an oversized or odd-shaped score.
(Created by an anonymous former Art Book Room worker, with slight revisions)

Print-friendly version:
Making pockets for parts:
Here are a few folded pockets for holding parts, or scores plus parts.
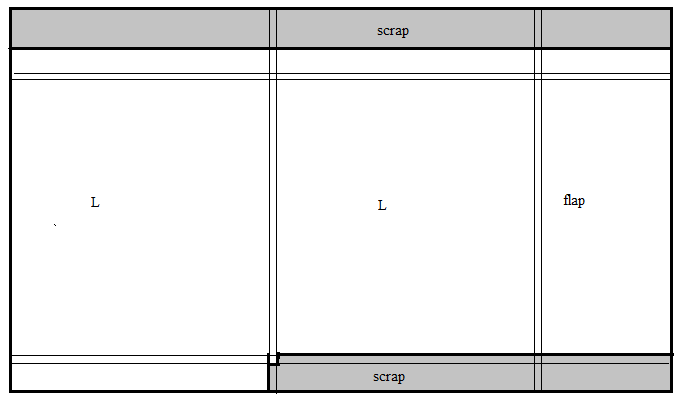
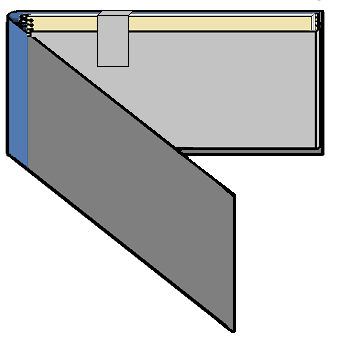
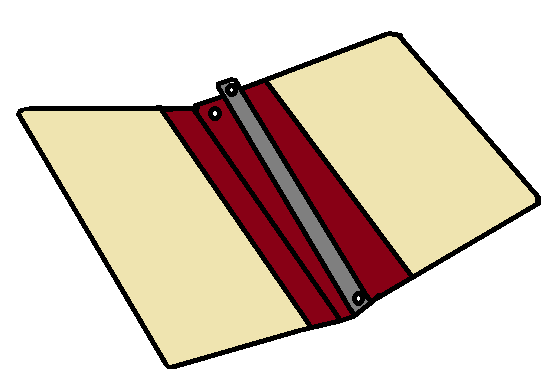
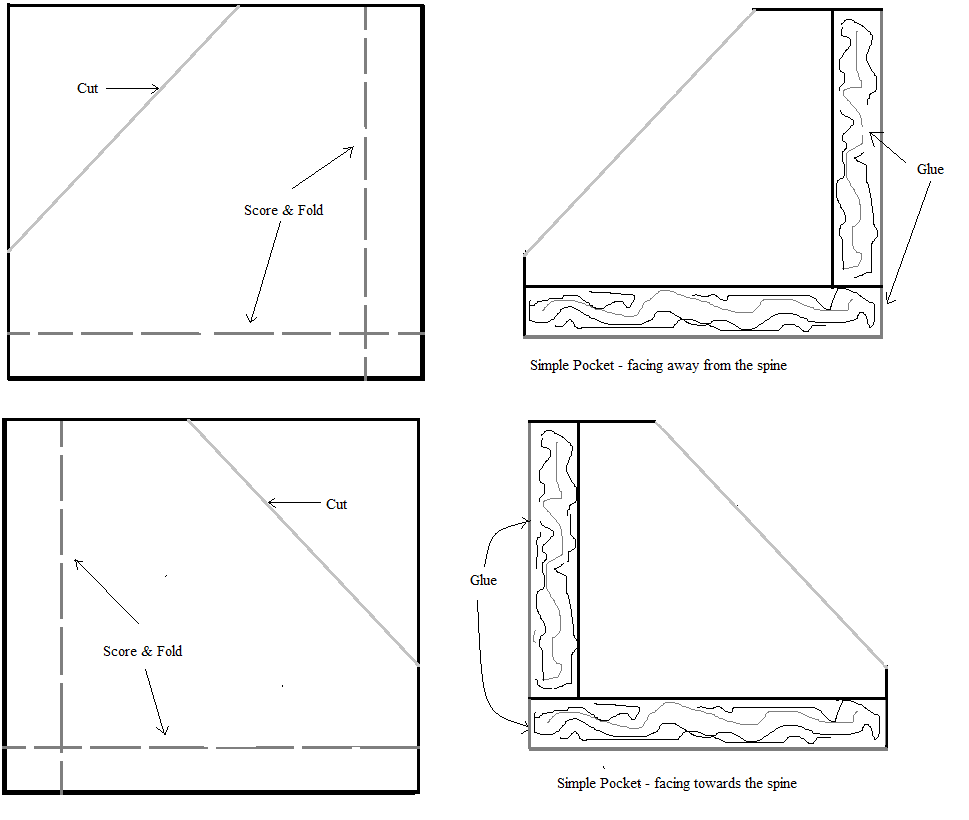
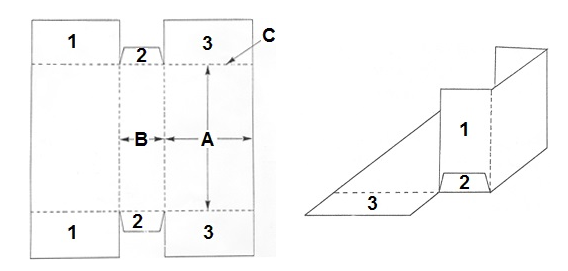
Simplest Pocket for a thin part:
Pattern for a simple pocket, best folded from strong, but not card-weight, paper or Tyvek (if you can find it). I have used this pocket for fairly thin parts with a score, or for pockets inserted into the back of a thick score itself:
Strong pocket for several thin parts
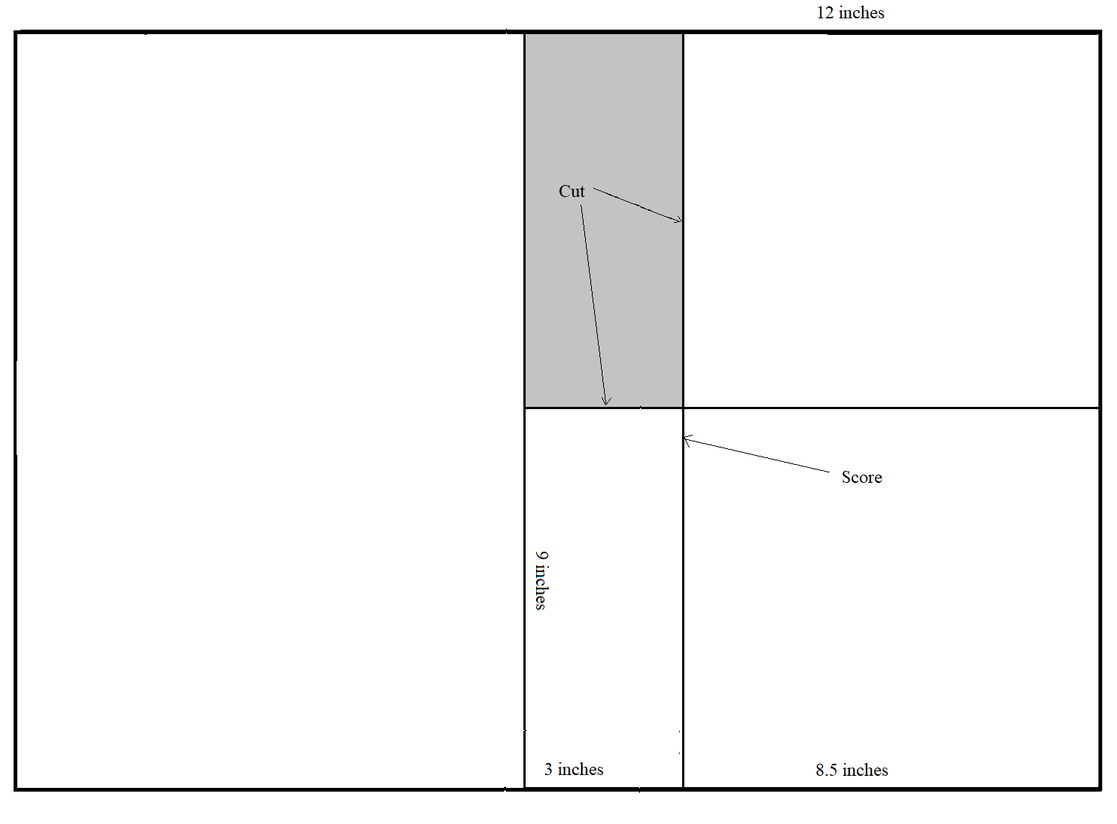
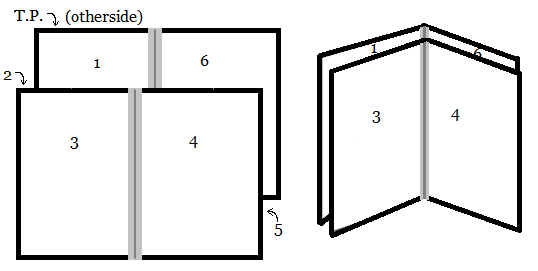
Measure & mark lines with a metal ruler; then cut the pocket (with a cutter if available, or scissors if you have steady hand) and cut out the waste piece.

Quickly glue the bottom flap over the back fold, then…
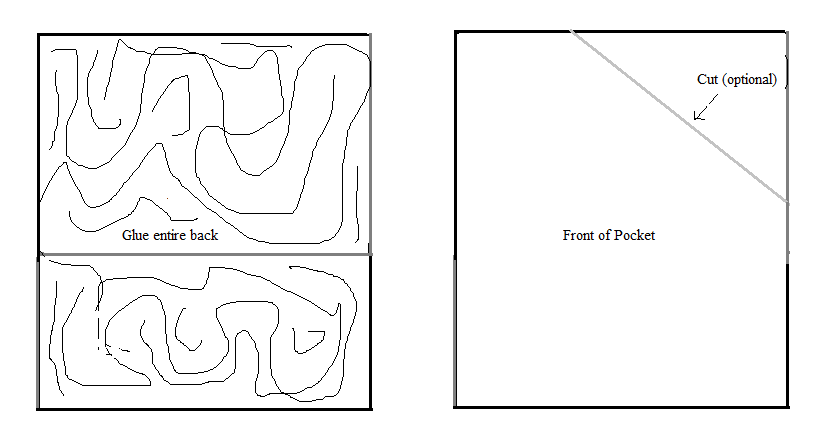
Glue the back quickly to the pamphlet binder (usually facing towards the spine), and insert wax paper into the pocket and between the pocket and the score, then press the pamphlet binder overnight with a heavy brick or book.
Strong Square-Back Pocket
For thicker parts or a score plus numerous parts.
First figure out how thick the square back will be by measuring the parts stacked together as they would sit in the pocket.
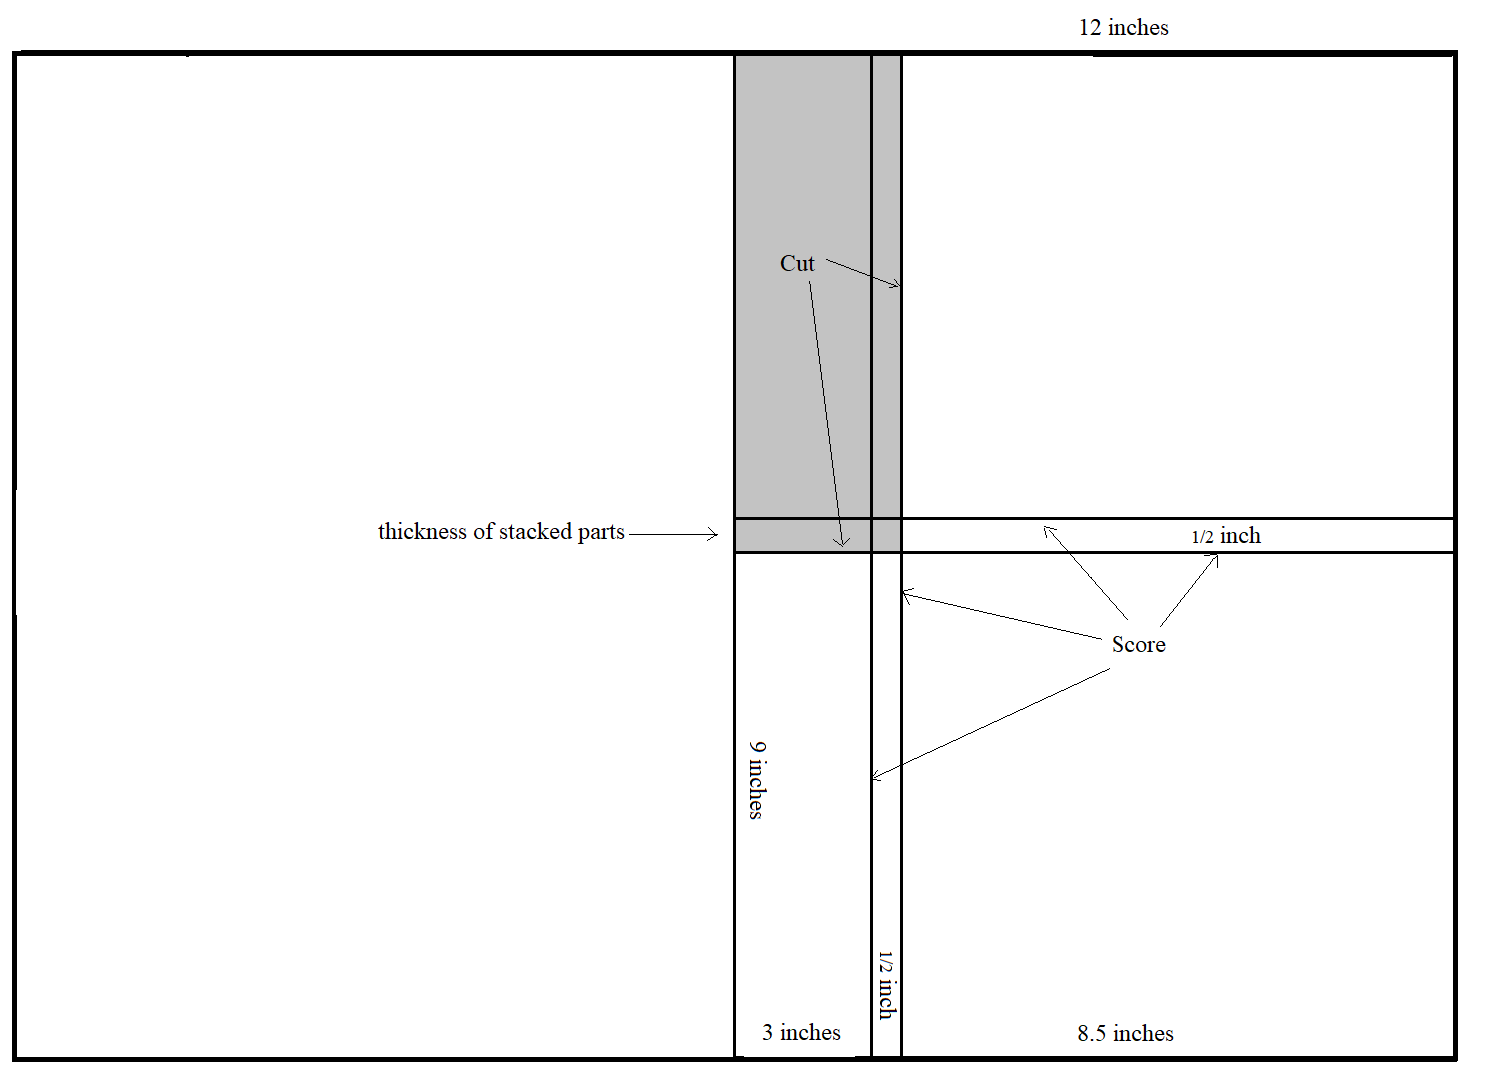
Measure and draw (with a pencil) the cut lines and folds for the pocket (the height of our pockets are usually about two thirds to three-quarters of the height of the parts) and cut out the waste.
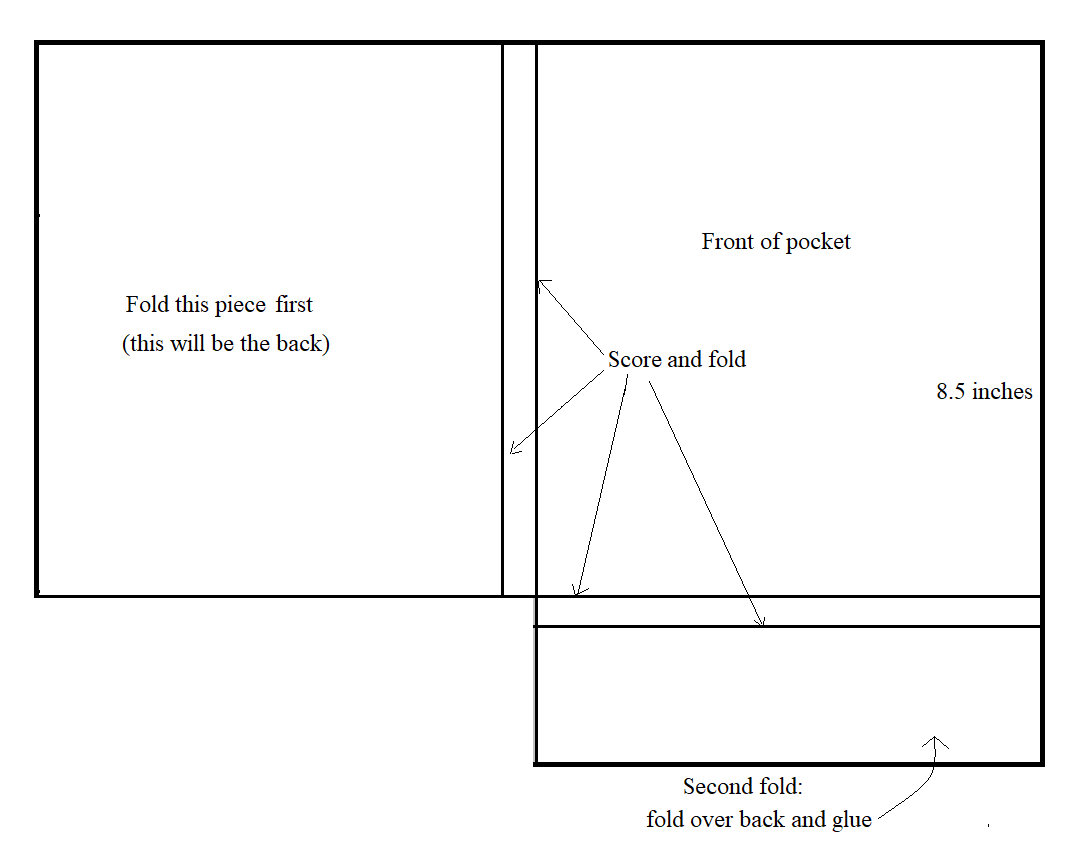
Score, then fold on the creases and glue the bottom flap to the back piece, then quickly:
Spread glue over the entire back to the pamphlet binder, and press the pocket into place on the pamphlet back. Wrap the parts with wax paper and insert them into the pocket, then press everything in the pamphlet binder overnight with heavy book or brick on top.
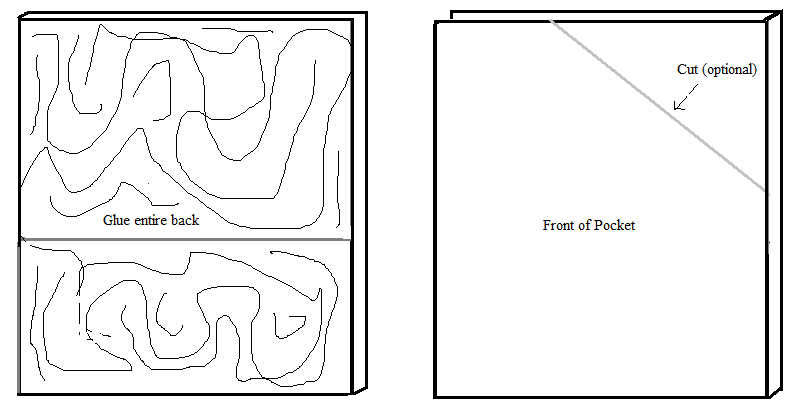
Simple Slipcase/Pocket:
Requires archival, permanent, double-sided tape.
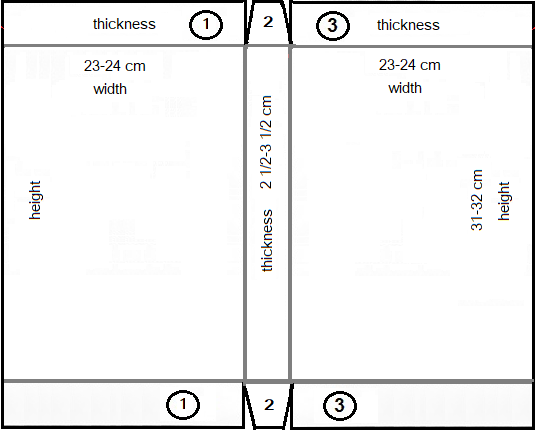
For bulky paperback scores or spiral/comb scores plus parts. The flaps are taped together (in the order of folding) with archival permanent double-sided tape. Cut a notch in the front to allow for easier removal. These measurements fit our most common size of score and pamphlet binders (the thickness will vary).
Warning: I discovered this is slipcover can be easy to pull apart:
However, since the folded edge is the strongest, it can still be used, if turned so the strongest folded side is down; then glued into a wide binder (Based on the slipcase below from CCI.)
Stronger Slipcase/Pocket
The last two flaps are glued to the back with binder glue.
Archival “permanent” double-sided tape is used for the other flaps.
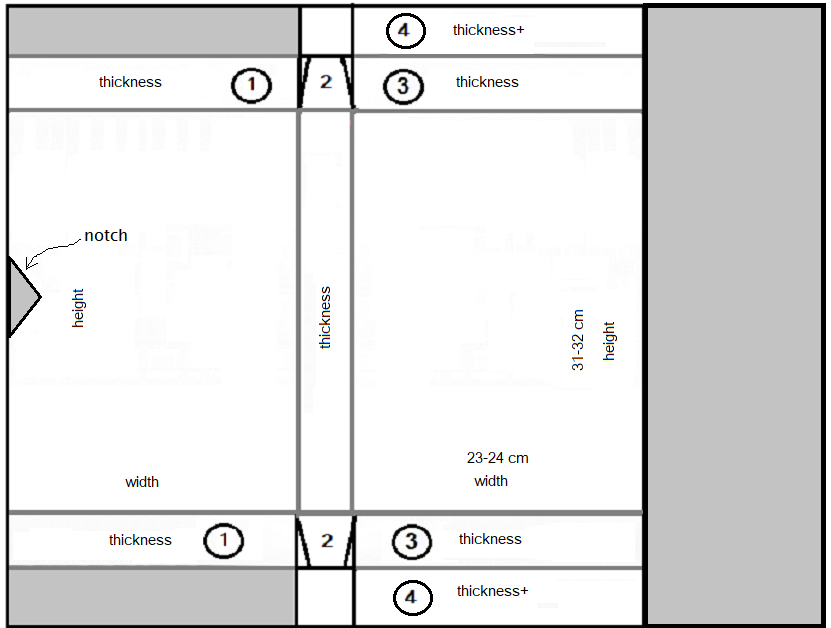
This slipcover has an extra flap (4) which folds over & is glued to the back, which makes it much stronger than the previous slipcover. The other flaps and tabs may be taped with archival “permanent” double-sided tape. Cut a notch in the front.
After gluing the two flaps to the back, cover entire back with glue, press into binder, then wrap the set of scores & parts in wax paper, insert in pocket, and let it set overnight, with a weight on top.
Other Enclosures and Boxes
A simple slipcase to stand alone, from Canadian Conservation Institute:
We possibly could make this one from a strong cardboard.
An enclosure, with a flap to close the end:
Here’s one, with with a flap to fold over the open side. Instructions can be found here: https://libpres.sitehost.iu.edu/manual/treatments/pampock/pampock.html. I haven’t tested this one.